Homemade Back Bacon

Lean, flavorful, and smoked just right, homemade Back Bacon is a breakfast and brunch staple you can make right in your own home! Easy and amazingly delicious, Back Bacon is a must for anyone who loves smoking meats!

This post may contain affiliate link(s). As an Amazon Associate, I earn from qualifying purchases. See Disclosure.
Famous in England and Ireland – and throughout the UK, Back Bacon is porky goodness for sure! Lean, tender, smoky, and fabulously delicious, this breakfast and brunch staple is less popular in North America, but it shouldn’t be!

The Backyard Table
Recipes for Summer Cookouts
Level up your outdoor dining with Chef Jenn’s The Backyard Table! For only $7.99, you get 50+ pages of tested recipes including Grilled Corn Guacamole, French Onion Burgers, and Blueberry Grunt. 100% chef-created, no AI, and just pure foodie love.
This is a digital product. You'll receive an instant download link after purchase.
Get ad-free recipes like Grilled Corn Guacamole, Grilled French Onion Burgers, Deviled Egg Pasta Salad, Blueberry Grunt, and so many more!
You can make homemade Back Bacon in your kitchen – it’s not hard! It takes a 5-day cure – which I’ll walk you through – and then some time on the smoker. But the results are so worth it! It’s meaty, tender, juicy, smoky, porky, and oh-so-crazy-good!

What you’ll love about Homemade Back Bacon
- It’s so good! Juicy, smoky, tender, and delish!
- So much tastier than store-bought – not to mention cheaper!
- It freezes great, so make a big batch, then slice and freeze!
What Is Back Bacon?
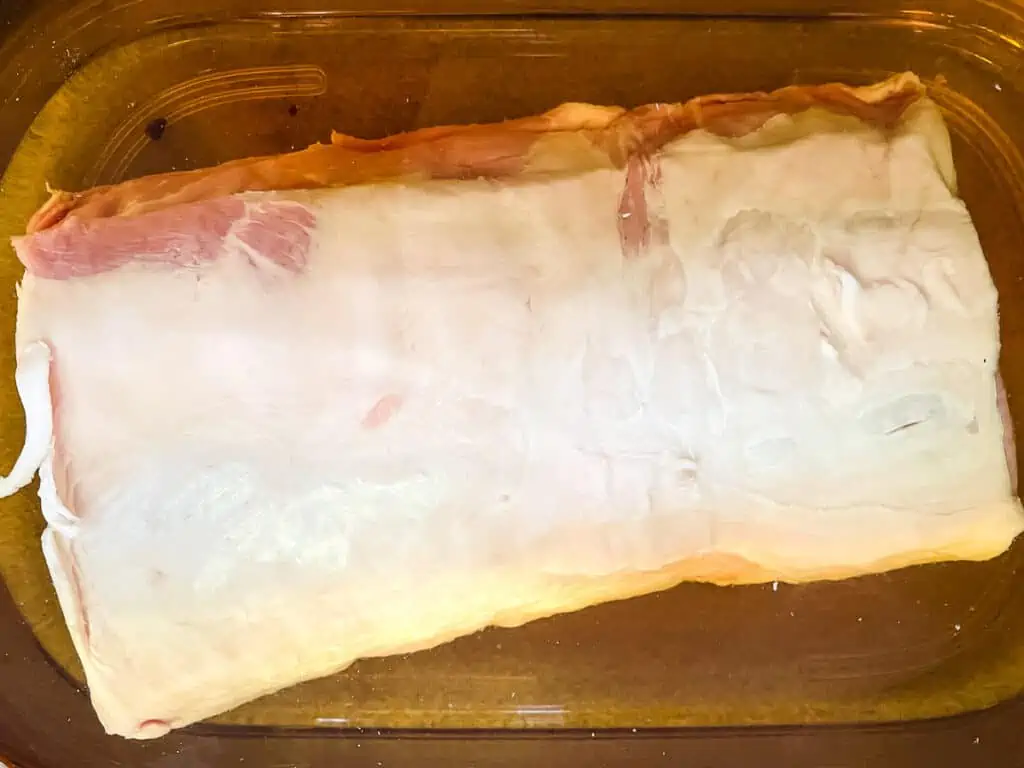
Back bacon is cured and smoked pork loin. It’s not really bacon at all, except that it usually has some pork belly attached to the loin. If you buy the whole packer pork loin and trim it yourself, you can keep the pork belly attached. Otherwise, you may have to ask the butcher for a loin with the belly attached.
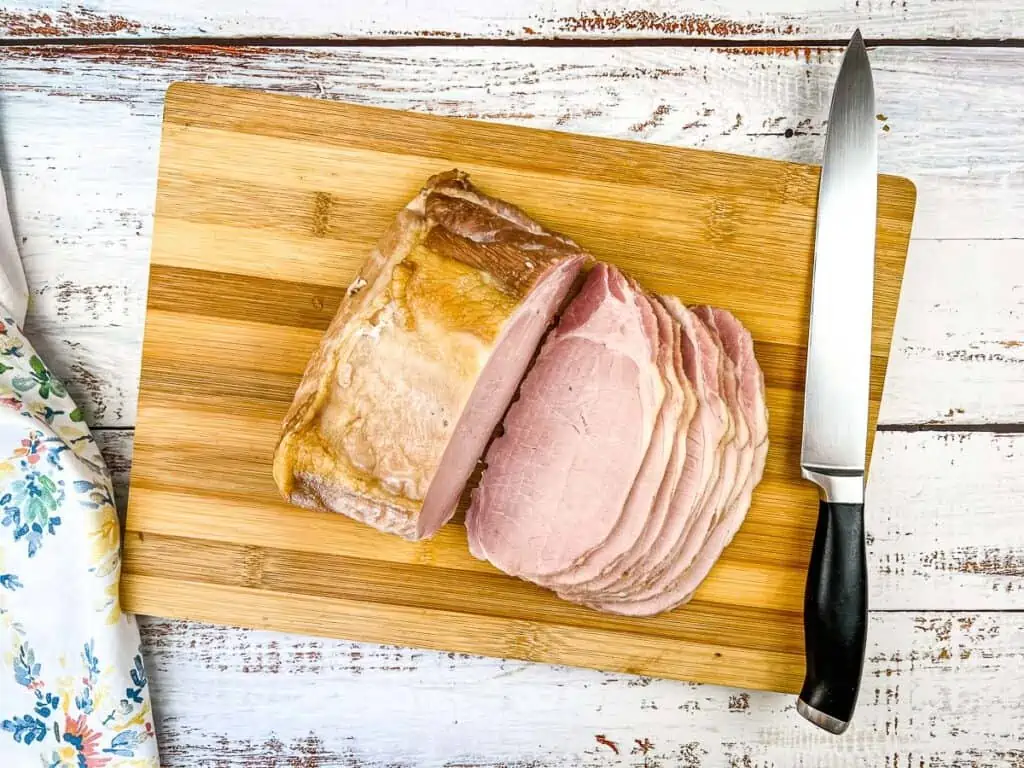
See that fatty and darker bit of meat in the picture? That’s the pork belly. Don’t trim it off! It’s soooo good!
Ingredients
- Pork loin – With some pork belly attached.
- Water – Always start your cure in distilled water or boiled and cooled water.
- Kosher salt – I use kosher salt in my cured recipes because it has a purer flavor. Use half as much table salt if you use that.
- Sugar – White granulated sugar. Not much sugar gets into the pork loin, and don’t worry, the meat won’t be sweet tasting.
- Bay leaves – Whole dried bay leaves.
- Garlic – Fresh cloves, and give them a smash to crush them.
- Peppercorns – Whole black peppercorns.
- Prague Powder #1 – This is what you’ll use to cure the meat.
You’ll Also Need
- Container – A large food-safe container big enough to hold the pork and 1 gallon of water that’ll fit in your fridge.
- Smoker – I use a Traeger pellet grill, but any smoker capable of holding consistent heat will work.
- Applewood pellets – Or your favorite pellets.
- Digital meat thermometer – Always cook to temp, not time!
- Meat slicer – Optional, but a slicer works best to get the most even and thin slices.
What Is Prague Powder #1?
The secret ingredient to a successful cure is Prague Powder #1. Also called tinted cure or pink curing salt, it is a combination of 6.25% sodium nitrite and 93.75% sodium chloride.
Prague Powder #1 is the secret behind cured meats keeping their flavor and long shelf life. This curing agent inhibits the growth of bacteria and helps preserve flavor and color.
**Warning – Prague Powder #1 is NOT table salt! DO NOT use it in place of pink Himalayan salt or any other salt. Keep this product out of reach of children and label it appropriately.
How To Make The Best Homemade Back Bacon
For a full list of ingredients and instructions, please scroll down to the recipe near the bottom of this page.
Add the water to a large container that is big enough to hold the pork loin and fit in your refrigerator. Stir in the sugar and salt until they are completely dissolved.
Add the Prague Powder #1, bay leaves, garlic cloves, and peppercorns to the brine and mix well.
Rinse the pork loin under cool water, then place it into the brine. Cover the container and refrigerate for 5 full days.
Turn the pork loin over and stir the brine once a day to help the cure distribute evenly.
On the morning of the 6th day, remove the pork loin from the brine and rinse it thoroughly. Fill the container with enough cold water to completely cover the pork and refrigerate it for 30 minutes. Drain the water, refill the container with fresh cold water, and soak the pork for another 30 minutes. These soaking steps help remove excess salt from the cured meat.
Preheat your Traeger smoker, or another smoker, to 180°F according to the manufacturer’s instructions.
Place the cured pork loin in the smoker and smoke it at 180°F for about 30 minutes to develop smoky flavor.
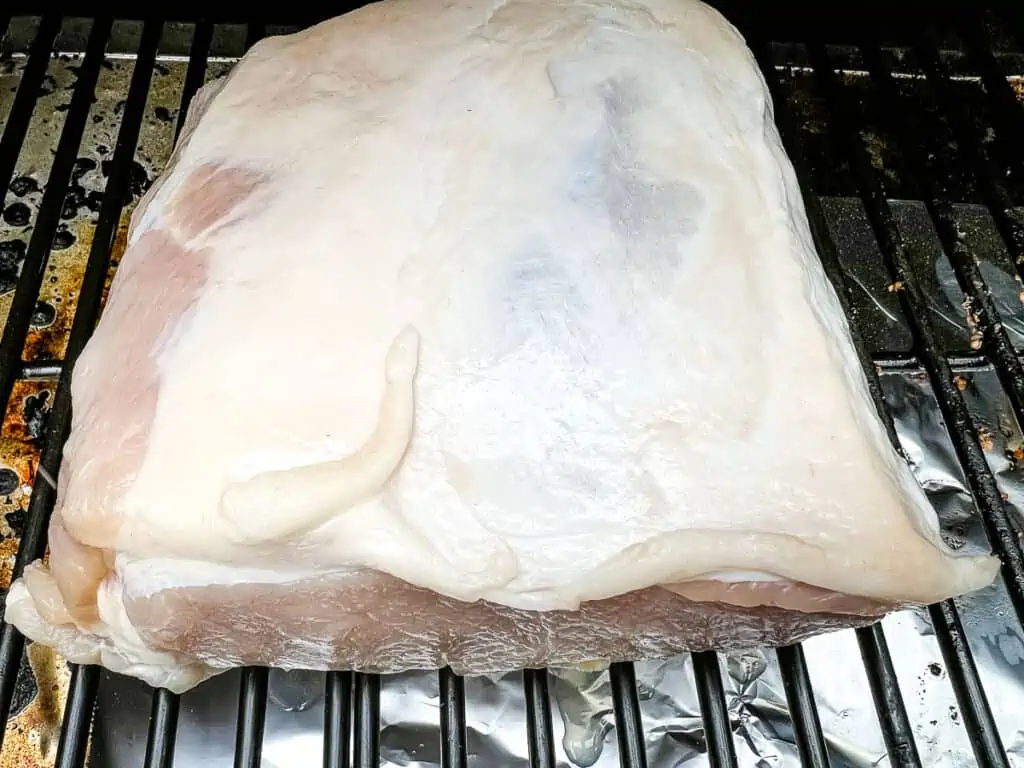
Increase the smoker temperature to 250°F and continue smoking until the pork loin reaches an internal temperature of 145°F.
Remove the back bacon from the smoker and let it rest for about 20 minutes before slicing.
Slice and serve warm, or chill and slice as needed for future meals. Enjoy!
How To Get Perfectly Even And Thin Slices
If you do any serious curing and smoking, you need to have a meat slicer. Meat slicers will effortlessly cut through big hunks of meat, creating super-thin slices that are perfect for sandwiches and more. To get thin slices of back bacon, chill the back bacon before slicing. Cool it on the counter for about 45 minutes, then wrap it in plastic wrap and chill it overnight. Then slice it; your slices will be even, thin, and perfect.
Chef Jenn’s Tips
- Curing is not a quick process. Make sure you have enough time to properly cure the meat and that you have time on the 6th day to desalinate and smoke the back bacon.
- Fat is your friend! Don’t trim too much of the fat from the pork loin, and leave the pork belly intact!
- You’re smoking the back bacon a bit higher than normal to avoid a stall.
- Pull the pork off to rest when it hits 145-F so that it stays juicy and tender.
Make It A Meal
Wondering how to serve Back Bacon? It’s so versatile and can be enjoyed in many ways. Here are some of my favorites:
- Lightly pan-fried back bacon goes with any breakfast!
- Back Bacon is an essential part of a traditional English breakfast (back bacon, sausage, eggs, grilled tomatoes, beans, toast, and sometimes more!).
- Use it wherever you’d use ham – on breakfast sandwiches, in casseroles, in soups, or just nibbled on.
- Charcuterie boards – Jazz up your next charcuterie board with cured back bacon.
- Sliced for dinner – Serve it with your favorite sides, like cheesy potatoes, creamed corn, spaghetti squash, and more.

Storage
Back bacon is cured, so it’ll be fine in your fridge – if tightly wrapped – for a week or 10 days. To keep it longer, freeze it! Use a vacuum sealer and freeze portions of back bacon to enjoy later. They’ll keep in your freezer for a year or longer.

Homemade Back Bacon
Equipment
- Large container big enough to hold meat and brine but still fit into your fridge.
- Meat slicer optional but handy
Ingredients
- 5 pounds pork loin with pork belly attached
- 1 gallon distilled water or boiled and cooled tap water
- 3/4 cup kosher salt use half as much table salt
- 3/4 cup sugar granulated white sugar
- 2 teaspoons Prague Powder #1
- 4 bay leaves
- 3 cloves garlic smashed
- 1 tablespoon whole black peppercorns
Instructions
- Add the water to a large container (that'll fit into your fridge) and dissolve the sugar and salt in the water. It'll take some mixing, but it needs to be dissolved.
- Add the Prague Powder #1, bay leaves, cloves of garlic, and peppercorns to the water and mix well.
- Rinse the pork loin, then add it to the water and pop the whole thing into the fridge for 5 full days.
- Turn the pork over and give the water a stir once a day.
- On the morning of the 6th day, drain the water and rinse the pork. Fill the container with enough cold tap water to cover the pork, then pop it into the fridge for 30 minutes. After 30 minutes, drain the pork and cover it with water one more time, letting it sit for 30 minutes. You do this to remove excess salt.
- Preheat your Traeger smoker (or any other smoker) to 180-F and smoke the cured pork for about 30 minutes to give it a good dose of smoke.
- Turn the heat to 250-F and continue smoking the pork loin until it reaches 145-F.
- Rest the back bacon for about 20 minutes, then slice and serve!
Notes
Chef Jenn’s Tips
- Curing is not a quick process. Make sure you have enough time to properly cure the meat and that you have time on the 6th day to desalinate and smoke the back bacon.
- Fat is your friend! Don’t trim too much of the fat from the pork loin, and leave the pork belly intact!
- You’re smoking the back bacon a bit higher than normal to avoid a stall.
- Pull the pork off to rest when it hits 145-F so that it stays juicy and tender.
Nutrition
A Note on Nutritional Information
Nutritional information for this recipe is provided as a courtesy and is calculated based on available online ingredient information. It is only an approximate value. The accuracy of the nutritional information for any recipe on this site cannot be guaranteed.
Ohh back bacon is delicious! I used mine on a charcuterie board and the leftovers in a pasta the next day!
100% blown away that I have successfully made bacon! I’m going to make another batch closer to the holidays to use in all my holiday recipes. Thanks so much for sharing how to do it!
I would never have thought to do this but I came across your recipe and gave it a try. The back bacon turned out perfect. The flavors are spot on. My husband can’t wait for us to make again.
With a little help from my dad’s smoker, I successfully pulled this off! It was perfect for a family breakfast and we will definitely make it again. Next time, I might put it on a charcuterie board at Thanksgiving!
I read this post at breakfast time whilst pondering smoking my own bacon, and now it’s all I can think about! Thanks for such an informative post, I feel very prepared and I’m off to get all the ingredients!
How could you make this without pink salt? Longer curing time?
No, you cannot make it without the curing salt. The curing salt is an essential ingredient to preserve the meat and preserve the color. It wouldn’t be back bacon without it, and I don’t recommend trying it. Sorry! ~Jenn
Oh WOW!!! We always loved the back bacon on our trips to Ireland. Last time we were there was in 2016 when I retired. I feel so lucky to have found this article to make my own. I already have everything to make it as I smoke quite a bit, I just never have tried curing and smoking bacon.
Now, I do have one question…. Can this process be used to make Turkey Bacon? And if so, how would I go about slicing the breasts? I assume that turkey bacon you get in the stores is ground and formed bacon. I do have a jerky gun that would make flat strips as well as a grinder and slicer.
Thanks again for making my day with this recipe.
I’ve never tried to cure poultry – I’m honestly not sure it’d work the same way! I do make pork bacon, but that’s also cut from the belly which turkey’s obviously don’t have. I think the closest you’d get is turkey jerky which you could make from the breast, but that wouldn’t need curing. Could be an interesting project! Sorry I can’t help more but I’m glad you had a trip down memory lane! ~Jenn
Where would you find PRAGUE POWDER #1? Might have to build my own “Smoke House” to be able to do Large Batches 😀
I order it from Amazon. Large batches are the only way to do it! Enjoy! ~Jenn
Another place to try is The Sausage Maker store and website run by the family of the late Rytek Kutas, author of Great Sausage Recipes and Meat Curing, the first accurate manual for making sausage and curing meat both at home and in a sausage kitchen. I think it’s over sixty years old now.